
Table of Contents
- Why Heat Ruins Prints (And How to Avoid It)
- The Step-by-Step Method to Iron Graphic Tees Safely
- How to Wash Graphic Tees to Prevent Print Damage
- Can You Use a Steamer on Graphic Tees?
- How to Fix Cracked Screen Print on a Shirt
- Alternative Wrinkle Removal Methods
- Material-Specific Heat Thresholds
- Common Mistakes to Avoid
- Frequently Asked Questions
Last Updated: September 10, 2026
Why Heat Ruins Prints (And How to Avoid It)
Heat is the single greatest threat to a graphic tee. The printed layer on most decorated shirts, screen print, direct-to-garment (DTG), or heat transfer, is a plastic-based film bonded to the fabric surface with a thermal sensitivity threshold. Exceed it, and the print softens, stretches, or melts into the cotton weave.
The damage isn't always instant. A shirt can survive one hot iron and look fine, then crack three washes later because the bond was weakened. Print degradation is cumulative, every exposure to excessive heat shortens the print's lifespan.
The fix: protect the print from direct contact, keep the iron plate on low heat, and let steam do the work pressure otherwise would. Below is the exact method, plus what to do when a print is already cracked.
The Step-by-Step Method to Iron Graphic Tees Safely
Ironing a graphic tee without damaging the print takes about three minutes once your station is set up. The method works on screen print, DTG, and heat transfer vinyl alike. The principle is identical: heat the fabric, never the ink.
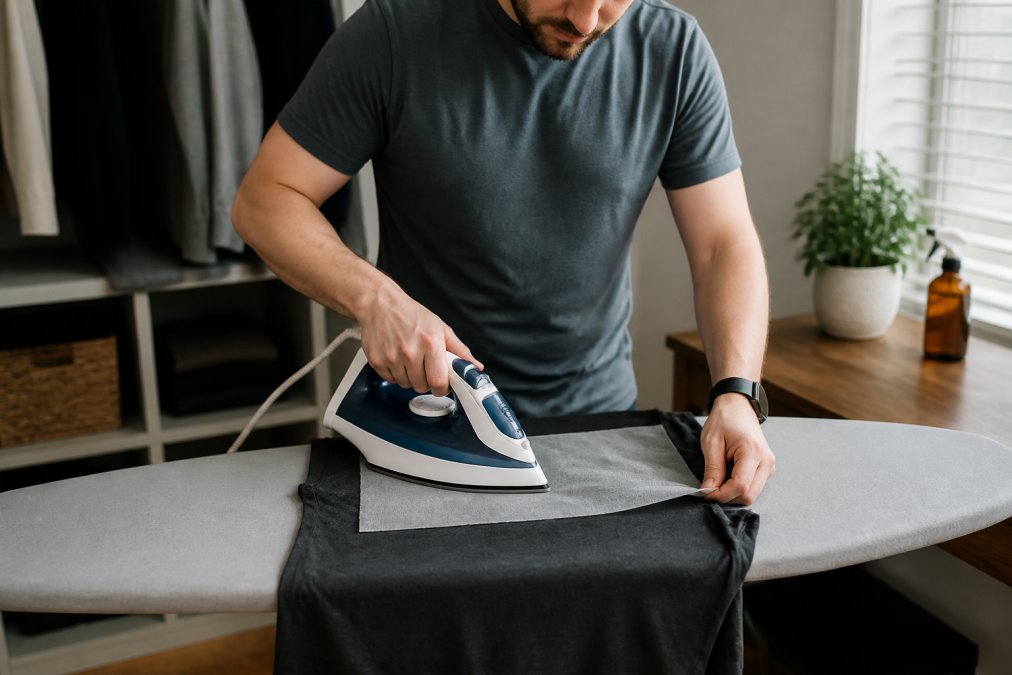
Step 1: Prep the Shirt
- Turn the shirt inside out so the printed side faces inward.
- Lay it flat on the ironing board, smoothing out major creases by hand.
- Check the care label for any fiber-specific warnings before you apply heat.
Turning the shirt inside out creates a protective layer of fabric between the iron and the ink, one habit that prevents most print damage.
Step 2: Set Up Your Ironing Station
- Set the iron to its low-heat or synthetic setting. If your iron has a numbered dial, stay at 1 or 2.
- Empty the water reservoir or switch off the steam function for the first pass.
- Place a pressing cloth or a sheet of parchment paper over the print area.
A pressing cloth distributes heat evenly and stops the iron plate from touching the graphic directly. Parchment paper works just as well.
Step 3: Iron the Shirt
- Press the iron onto the fabric using light pressure. Don't grind it back and forth.
- Work in short passes, lifting the iron between strokes.
- Iron the unprinted areas (sleeves, back, collar) at normal heat.
- For the printed area, use the steam function held two to three inches above the shirt rather than pressing down.
- Hang the shirt immediately to let remaining creases fall out.
How to Wash Graphic Tees to Prevent Print Damage
Washing causes more print failures than ironing. The mechanism is mechanical, not just thermal: the agitator and tumble cycle flex the fabric thousands of times per wash, and the cured ink film doesn't flex at the same rate as the cotton weave beneath it. Every flex cycle loosens the bond line. Add dryer heat and the plasticizer in the ink softens, that's when cracking and edge-lift begin.
Reduce both flex and heat. Here's the sequence that protects the print longest:
- Turn the shirt inside out before it goes in the drum. The fabric face takes the agitator's abuse, so the ink layer isn't scuffed by other garments.
- Wash on cold. Cold keeps the ink film rigid rather than soft; warm and hot water accelerate dye migration and adhesive breakdown.
- Use a gentle or delicate cycle with a low-spin finish. High spin speeds whip the shirt against the drum wall and stretch the fabric under the print.
- Skip fabric softener and dryer sheets. Both leave a waxy residue that coats the print and interferes with the adhesive bond; liquid softener also traps oils that dull the ink.
- Wash graphic tees with similar-weight items. Zippers, hooks, and heavy denim abrade the print even when the shirt is inside out.
- Don't overload the machine. A packed drum increases friction and stops the shirt moving freely, which is what actually cleans it.
The Drying Step Matters Just as Much
Air-dry graphic tees whenever possible. Hang them by the shoulders or lay them flat; hanging a wet heavyweight cotton tee by the collar can stretch the neckline. If you tumble dry, use low heat and pull the shirt out slightly damp, then hang to finish. High dryer heat does the same damage as a hot iron, just more slowly and across the whole garment.
| Method | Setting | Effect on Print |
|---|---|---|
| Cold water wash, gentle cycle | Inside out, low spin | Preserves bond |
| Warm water wash | Normal cycle | Gradual fade, softened adhesive |
| Hot water wash | Any cycle | Accelerated cracking and dye bleed |
| Air-dry flat or hung | Room temp | No damage |
| Tumble dry low | Low heat, remove damp | Minimal risk |
| Tumble dry high | High heat | Cracking, peeling, shrinkage |
A Note on Print Type
Thick plastisol screen prints tolerate washing slightly better than thin DTG prints because there's more ink film to absorb flex. Heat transfer vinyl sits in between, but its weak point is the decal edge, where lifting starts. For all three, the inside-out, cold, low-spin routine is the highest-impact habit you can build.
Can You Use a Steamer on Graphic Tees?
Yes, a garment steamer is the safest wrinkle release method for graphic tees. Steam relaxes cotton fibers without the friction or direct heat of an iron plate, so the print never touches a hot surface. Hold the nozzle two to three inches from the fabric and let the steam pass over the shirt.
A handheld steamer handles most touch-ups in under a minute, and for raised screen prints it's the only method that removes creases without flattening or cracking the ink. The limitation: steam won't press a sharp crease into a collar or sleeve. If you need crisp edges, iron those areas separately with the print folded away.
How to Fix Cracked Screen Print on a Shirt
A cracked screen print can be improved, but not fully restored, once the ink layer fractures, the cracks are permanent. What you can do is stop the damage spreading and make existing cracks less visible.
Step 1: Stabilize the Existing Cracks
- Wash the shirt inside out in cold water from now on to slow further cracking.
- Lay parchment paper over the print and press lightly with a low-heat iron to soften crack edges and press them flatter.
- Never stretch the shirt while wet, wet cotton stretches, and the print doesn't stretch with it.
- If the print is peeling at the edges, a fabric adhesive designed for heat transfer repair can re-bond small sections.
Step 2: The Rescue Protocol for a Melted or Stuck Print
You pressed the iron directly onto the print, and now there's a shiny patch, a smeared edge, or ink stuck to the iron plate. Here's how to handle it.
If ink transferred onto your iron plate:
- Let the iron cool completely.
- Wipe the plate with a cloth dampened with rubbing alcohol or a baking soda-and-water paste. Don't scrape with metal.
- Run the iron over scrap cotton to confirm no residue remains before using it on clothing again.
If the print melted onto the shirt:
- A shiny, glazed patch means the top layer of ink softened and re-fused. You can't un-melt it, but you can reduce the shine by laying parchment paper over the area and pressing very lightly with a low-heat iron for two to three seconds at a time.
- If the print stuck to the fabric in a new spot (a fold, for example), don't pull it apart while hot. Let the shirt cool, then gently work the fabric apart, pulling while warm stretches the ink and worsens the smudge.
- If a section lifted and re-adhered in the wrong position, a heat-transfer repair adhesive can re-bond it, but the alignment will be off. In most cases, the shirt becomes a work shirt.
Step 3: When to Stop Trying
If the print has cracked across more than roughly a third of its surface, or the ink has peeled away in sheets rather than lines, repair isn't worth the effort. The shirt is still wearable, treat it as a plain tee from here on. The same habits that prevent cracking (inside-out washing, cold water, low heat, pressing cloth) keep a repaired print from getting worse.
Alternative Wrinkle Removal Methods
Not every shirt needs an iron. Several no-contact methods remove creases from graphic tees without any risk to the print.
- Hang it in the bathroom during a hot shower. Ten minutes of shower steam relaxes cotton fibers; best on light wrinkles.
- Spritz with water and smooth by hand. A spray bottle of cold water plus a few minutes of hanging lets the fabric relax.
- Use a wrinkle release spray. Spray, tug gently at the seams, and hang.
- Roll the shirt and let it rest. Roll a slightly damp shirt tightly and let it sit fifteen minutes to redistribute fibers and drop most creases.
- Weigh it down flat. Lay the shirt flat under a clean towel or book for an hour and let gravity work.
For heavy-weight cotton, steam is the only alternative that reliably handles deep creases; lighter blends respond well to spray-and-hang.
Material-Specific Heat Thresholds
Different fabrics tolerate different heat levels, and the print type matters as much as the fiber. Here's how the common shirt materials break down.
| Fabric | Safe Iron Temp | Print Risk |
|---|---|---|
| 100% cotton | Low to medium | Moderate; use pressing cloth |
| Cotton blend (50/50) | Low | Higher; synthetic fibers melt |
| Polyester blend | Low only | High; plastic print and fiber both soften |
| Tri-blend | Low only | High; heat-sensitive fibers |
The rule across every material: when in doubt, go lower. Too low just takes an extra pass; too high is permanent damage. Synthetic fibers and print films have overlapping melting points, so a setting safe for the cotton can still ruin the print on a poly blend.
Common Mistakes to Avoid
The same handful of errors account for most ruined graphic tees. Avoiding them is easier than fixing the damage.
- Ironing the print face-up. This puts the iron plate in direct contact with the ink. Always work from the inside out.
- Skipping the pressing cloth. Even on low heat, direct contact over time degrades the print.
- Using the steam burst function directly on the print. A close-range burst of hot water and steam can lift the edge of a heat transfer.
- Ironing over a zipper, button, or seam. Hardware concentrates heat and pressure in one spot.
- Storing shirts on wire hangers. The wire creates a crease line you then have to iron out, more heat exposure.
- Ignoring the care label. "Do not iron" usually means the print or fabric can't take heat at all.
Treating a new graphic tee like an old plain t-shirt is a common mistake, the print changes the rules. Build the inside-out, low-heat, pressing-cloth habit and protecting your graphics becomes automatic.
Graphic tees are built to be worn hard, not handled like fine china. The real challenge is that most people learn the wrong ironing habits on plain cotton and carry them straight over to printed shirts. Nation Swag Designs builds its crewnecks and tees on trusted blanks like Gildan and Bella + Canvas specifically because those fabrics hold a print through repeated washing and wear. Our Gildan fabric care guidance and Bella + Canvas garment care resources both confirm that low-heat, inside-out care is the standard for decorated apparel. If you want graphics that survive the wash cycle, start with American Cleaning Institute fabric care guidance and a shirt built to last. Browse the Nation Swag Designs collection and find designs that hold up as well as they look.
Frequently Asked Questions
Can you iron directly over a screen-printed graphic?
No, never iron directly over a screen-printed graphic. The heat from the iron can melt the ink, causing it to crack, peel, or stick to the iron. Always turn the shirt inside out or place a pressing cloth (like a cotton pillowcase or parchment paper) over the print before ironing. This protective layer distributes heat evenly and prevents direct contact. For extra safety, use the lowest heat setting and avoid steam, which can also damage some prints.
What is the best way to remove wrinkles from a graphic tee without an iron?
You can remove wrinkles without an iron by using a garment steamer, hanging the shirt in a steamy bathroom, or tossing it in the dryer on low heat with a damp towel for 5-10 minutes. A steamer is safe for most prints if you keep the steamer head a few inches away from the graphic and use low steam. Alternatively, lay the shirt flat and smooth it with your hands, then let it air-dry. These methods avoid direct heat and reduce the risk of print damage.
How do you fix a melted or cracked graphic on a t-shirt?
Fixing a cracked screen print is difficult, but you can sometimes minimize the damage. For minor cracks, try placing parchment paper over the design and ironing on low heat for 10-15 seconds; the heat may reactivate the adhesive and help the print adhere better. For melted prints, there's no reliable fix. To prevent this, always iron inside out with a pressing cloth and avoid high heat. If the print is severely damaged, consider replacing the shirt.
Is it safe to steam graphic tees instead of ironing them?
Yes, steaming is generally safe for graphic tees if done correctly. Use a garment steamer on a low setting and hold it a few inches away from the print. Avoid direct contact with the graphic, as excessive moisture and heat can weaken the bond. Steaming is a good alternative for delicate prints like direct-to-garment (DTG) and screen prints. Always test on a small area first and check the care label for specific recommendations.